Monday, December 18, 2017

Help kids learn tech skills without teaching tech skills

I have had multiple conversations lately about teaching technology, teaching with technology and learning technology skills. We know a large part of getting comfortable with technology is a result of just using it. Not taking a class, not reading about it but just trying it out. Young people are great at just trying things. Adults are usually a bit more cautious and prefer to acquire some knowledge about the technology before trying it and messing it up. Yesterday's conversation with a co-worker touched on how adults growing up without the immersion in the technology world lack the language and the building blocks that allow for comfort with the tools they must now use. They are required to use tech tools in their job without the time spent learning the basic skills to build upon. When I first started teaching “computer classes” to adults (before the Internet was a household word), I often spent time on terms and definitions, identifying and naming parts of the computer or application components. People sometimes felt this was boring, but without it, I could not continue teaching the class without using words and phrases like “point to this thingy” or “press the button on the big square box”. 

Talking with Ashley, one of our elementary media specialists, recently confirmed by experiences with students. Even though they have grown up with devices and gadgets, students have similar issues as the adults who are trying to get up to speed. Students have spent the time using the tools but they don’t necessarily have the language needed to explain it or build on the skills they have. When being assessed on their tech skills it is quite possible that they know how to do the skill or concept that is requested or referenced, but they don’t realize it because there have never been words put to it in their mind. 

Children learn a lot about their world by adults modeling and verbalizing their daily activities. For example, if while your child is young you go outside to play every day, at some point during the day you probably say “let's go outside to play”. Then you proceed to get ready. You may even talk about getting your jacket and putting shoes on and opening the door. What if you never use the words outside or inside when talking about that activity or while doing it, you just get up and do it in silence or while talking about something else. Later on, when you say “let's go outside to play” the child may have no idea what you are talking about. He knows how to play outside, he can physically get outside but he does not know what you are asking. I recently learned that verbalizing what you are doing while you are doing it is called self-talk in the speech therapy world. It is a key strategy that parents naturally use to interact with their young children and teach them language. It is something I have done for years but didn’t know it had a “name”. 

Self-talk could be a nearly effortless way of helping students learn the language of the technology that they use. If we only focus on learning technology by using it or teaching it specifically as an event, we are missing out on a huge teaching and learning opportunity. Teachers use technology every day. I can’t think of any teacher who does not check their email at least once or project something from their computer each day. What if you verbalized the steps while you were accessing the materials you use during the day or researching an answer to a question that a student posed? Suddenly the technology is not magical but there is a method and some logic to how things work. They could find out that you searched your Google drive for a keyword in the lesson you planned to use to locate and launch the document, or you clicked on the Recent view in your Drive because it makes it really easy to find the file you worked on yesterday. You might explain that you are opening a presentation that you created in SMART Notebook to demonstrate the ideas they are learning about today and that you need to navigate to your folder on the network to open the file that was named “Hooray for Adjectives”. And that the file is easy to find when you sort the files by name in the window by clicking the column header.

I remember doing this narration of steps at home quite often with my first child but I don't recall it as well with the rest of them.  I plan to work on it this year at home for tech related and household tasks.

Wednesday, April 19, 2017

Tuesday, April 18, 2017

Choose Your Own Adventure Writing with gSlides


Are your students getting ... distracted... this time of year? Do you need something different to spice up delivery of your stellar course content? Marzano points to student choice as one way to increase engagement in the classroom in his book The Highly Engaged Classroom.1 He goes on to further say creating choices that give students impact on their learning gives you the most bang for your buck. He recommends that choice can be offered in the learning tasks, options for demonstrating learning mastery, and determining goals or behaviors (pp. 14, 101).

One way to practice choice is to leverage the tools in a simple Google Slide to build activities that offer choices through hyperlinks on slides. Generally, slides are linear, one slide after another in a presentation format. Utilizing links to other slides creates a non-linear presentation that gives students practice with choice.

Think of Choose-Your-Own-Adventure books... if you want Timmy to explore the cave, go to page 23, if you want him to return home, go to page 47... You can build Choose-Your-Own-Adventure stories in Google Slides. Students could utilize a story written earlier in the year and collaborate with partners to embed adventure choices in their own stories. Or, you can give students choice on which concepts to explore first; allowing them to more independently navigate the material.

Students could build their own Slide Presentations with hyperlinks to write alternative endings or change a pivotal event in history. See the How-To Guide for steps to create your own non-linear slide presentation. 

What other ways could you use non-linear slides to give students choice in their work?

Resources:
1. Marzano, Robert J., Debra Pickering, and Tammy Heflebower. The Highly Engaged Classroom. Bloomington, IN: Marzano Research, 2011. Print.

How To Guide: http://www.controlaltachieve.com/2016/01/interactive-slideshow-story.html

Friday, April 7, 2017

Improve Learning with Feedback and Digital Assessments

At a recent conference I attended, Wes Kieschnick, an energetic teacher and motivational speaker said, “Technology is awesome! But, teachers are better.” Whoa! That is so true! Good teachers can become better, more engaging, and more efficient with the right types of technology support.


We know that feedback is important for students. When used correctly, feedback has an effect size of 0.73. That means making more than one year’s progress in a school year. Wow!


One of the most effective forms of feedback is a feedback cue. A teacher can get feedback on student learning and give students immediate feedback is to use technology for formative assessments.


Simply using a digitized formative assessment in and of itself is not going to produce the effect size Hattie explains in his meta-analysis research. But what can get you those results is using a digitized formative assessment that cues the students to their misconceptions and successes immediately by exploring the visual representation of the data the form creates.


Google Forms will automatically create graphs from the questions that you create. Google Forms Quizzes will automatically score the quiz and project the correct answers. What discussions can you have with your students around a graph like the one shown to the left?


There are many products that digitize assessments quickly and easily for teachers. Some are game-based, like Kahoot! and others, like Plickers, only require one web-enabled device which is utilized by the teacher to ‘read’ the unique answer cards students hold up to present their answer.


The quick, on-the-spot feedback on performance, along with the deeper thinking and discussion that can be spurred by digital assessment is not the only benefit. Many of these products also have data available for PLC discussions and teachers to utilize later to inform instruction and prepare students for a unit summative assessment.


For a more in-depth tutorial and information about digitzing feedback, see the LTL 21 Challenge: Digital Assessments. Log in with your district username and password.


For further reading about feedback:

What other resources do you use for feedback? Comment below!

Thursday, January 12, 2017

Accessing Canvas for Learn, Teach, Lead 21 Challenges


Learn, Teach, Lead 21 technology integration professional development challenges are available at any time through the Canvas learning management system. There are a few ways to access the challenges. You need to navigate to Canvas via the Staff Portal, the Popular Staff Links page or by typing chipfalls.instructure.com in your browser's address bar. The video below will help you navigate the challenges in Canvas if you need support.


Each challenge includes for parts: Introduction, Tools, Plan and Evidence Submission. Teachers are asked to choose a challenge and explore the Introduction and Tools sections in order to build background knowledge about the challenge and learn about some of the tools available to support the challenge.

Once you are ready, you can submit your plan in the Plan section. Your plan can be very simple as long as it provides enough details that coaches are able to support your needs and understand what you are working on. You can contact Cara (x2587) or Sarah (x2216) at any time in the process for assistance with training, coaching, in-class support or other questions. You can submit a plan at any time, even if you won't be completing the challenge in your classroom right away. You are able (and encouraged) to work with your PLC, team or grade-level partners to complete a challenge, however, each individual teacher must submit his or her plan for support and documentation purposes. Teachers may copy/paste the same plan and/or create a shared Google Document for a plan and submit the same link in Canvas.

After your plan is submitted, but sure to let us know what level and type of support you may need. If you do not need support, continue on with your plan as that unit plays out in your classroom.

If your challenge has a conclusion, you can submit evidence of the challenge once your class has completed the projects and activities associated with it. To do this, go to the Evidence Submission section in Canvas and submit an artifact and/or reflection of the challenge experience. If your challenge is on-going, you may choose the time to submit evidence when it feels like an appropriate point to do so.

Sarah Radcliffe will continue to make rounds at the schools around the district to provide support or training and to answer questions. Many teachers have already begun challenges or submitted plans for their challenges through Canvas. Look for information in your weekly school bulletins from the principal about available when I will be in your building. If there are other times that work for you, please see my Free/Busy calendar and send me and invite (linked below) or reach out via email or phone to connect.


Sarah Radcliffe, Instructional Technology Coach - Free/Busy Calendar


Friday, December 16, 2016

Gone Google Story Builder

The Gone Google Story Builder is an easy way for students to animate their writing by choosing characters and typing story dialogue. Some ideas to utilize this in your classroom:

  • Re-write the dialogue from a recent story to change the outcome or ending
  • A fun way to explain the steps in solving a math problem
  • Explaining a science concept to review for a test (each student could write and submit for different concepts to build a 'library' of the concepts needed to study for the test)
  • Take on the personality/personalities of famous people from history to discuss ideas and feelings around historical events
  • Create dialogue for a mock interview of a famous artist, scientist or inventor; discuss his/her creation or discovery
Here is an example: https://goo.gl/jDl7IB

There is no need to create an account, however, that means that the students must complete the story in one sitting. I would recommend that students write out their script in another Google Doc and copy/paste it into Story Builder when they are ready to render the video. Google Story Builder creates a unique URL to share the video/story. Students can submit these links in a Google Form Dropbox, via email, or in your learning management system.

This is a great way to stretch your use of Google Docs, Sharing and Collaborating. It would fit in to demonstrate part of the evidence for that Learn, Teach, Lead 21 (LTL 21) Challenge.

Thursday, April 7, 2016

Google Calendar Reminders Coming to a Calendar Near You


Reminders...

Coming to a Google Calendar Near You

Over the last few years of helping staff dive into Google for EDU tools, I have heard this sentiment over and over; "I wish the Google Task list had date/time reminders." A reminder feature had been added for the device apps, but was still lacking in the web version.

Yearn no more, those wishes have come true. You can now tap a time slot and select "Reminder".   The new reminders are persistent and carry forward on your calendar until you mark them as done. Check out this post from Google for more details and tips for switching from Tasks to Reminders.  Click here for instructions from Google Help.

The Reminder feature will be rolling out to our domain this week. Give it a try.  It works great with Google Keep too.  More info on that coming soon.

If you have questions about using Reminders or Keep, feel free to contact your Tech Coaches, Cara or Sarah.

Tuesday, March 15, 2016

Breakout EDU - Can you crack the code and open the box?

There is no doubt that gaming is a hobby sweeping the nation. Places like Tactical Escape 101 in Eau Claire have built a business around locking people in a room loaded with the clues and puzzles to solve to earn the key to escape.

Intriguing to adults and children alike, principals from Tactical Escape 101 can be applied to classrooms as well. Breakout EDU sells ready-made kits and games for teachers to use in the classroom. They also post open-source instructions to create your own kit from a few common items you can get from a local store.  There are ready-made games and templates to create your own.

Students work together to find a variety of hidden clues and puzzles. The puzzles need to be solved in order to find another clue or unlock a lock. Students need to communicate and problem-solve together because the clues are interconnected and often depend on one another.

Collaboration, communication and problem-solving skills are essential for students to continue to be successful in school and beyond school. Using collaborative games, like breakouts, can foster these skills in the classroom.

Teachers have also created their own puzzles or adapted the idea. Students must solve math problems or logic puzzles to earn a key; students must demonstrate practice of a skill recently learned in order to earn the combination to a lock. You could even stretch this out over a unit by using one lock for each concept, skill or standard and having students work together to unlock the box across an entire unit! Think of how curious they will be!

If you want to give this a try, contact Cara or Sarah to get started!

Wednesday, March 9, 2016

SMART Tips

SMART Tips


If you have a SMART board in your classroom or access one during the course of your day, read on. SMART Notebook 15 brought several updated features that you should check out. To find the version of Notebook you are using, choose Help, About SMART Notebook from the menu, then click on the Technical Support tab.


New SMART Ink
The floating toolbar has been replaced with the new SMART Ink.  I call it the ink bubble. Tapping this new bubble will give you access to most of the tools you were accustomed to on the floating toolbar, except the Screen Shade and Spotlight.  Those are still available with a couple of taps by accessing the SMART Tools menu on the System Tray (Windows). For more detailed instructions, check out the SMART Ink UserGuide.


Some of the toolbar items have new options:

Accessing shapes and polygons
  • Regular polygons are on the toolbar, irregular polygons are on the Tools menu.  
  • You can now divide shapes (circles, rectangles and squares). Right click the shape or choose Divide shape from the command drop down menu. Drag out divided pieces if needed.
  • Show/Hide vertices, interior angles and side lengths.  Find the options on the command drop down or right click menu.


Concept Mapping
  • Tap the puzzle piece on the toolbar
  • Choose concept mapping 
  • Tap + to add a node
  • Double-click inside a node to add details.


Add-Ons
  • There is a new Add On that makes it easy to add a YouTube video.
  • Click the Add-On Tab on the side bar to access the YouTube tool as well as SMART Blocks, Lesson Recorder, GeoGebra..
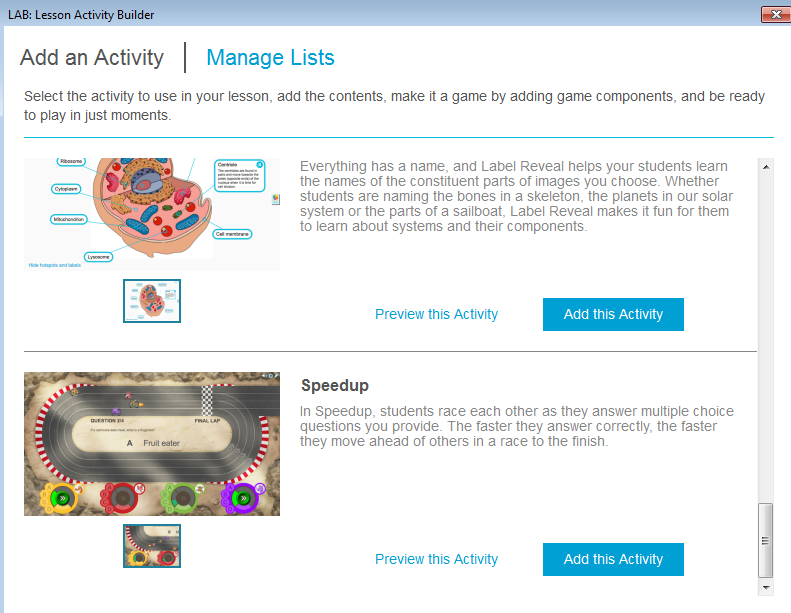
  • From the Insert Menu or the LAB button on the toolbar you can insert an activity from Lesson Activity Builder.  There are sorting, fill in the blank and matching activity templates where you fill in the content and even add game components to make it more fun.
  • Take advantage of mobile devices in your classroom with Shout It Out. With this LAB tool students can use any web enabled device to contribute text or images to your Notebook lesson, great for quickly assessing student progress or enhancing your discussion.


  • In version 15.2 the LAB includes two new activities: Label Reveal and Speedup.


Explore these items on your own, or check out this video reviewing Lesson Activity Builder apps that came with 15.1 and demonstrating the new ones that came with 15.2.  This video highlights a few of the new features in 15.2, including quickly inserting YouTube videos without ads, a fun lesson activity builder and some new themes.  If you would rather read more about these tools, take a look at this quick summary from Teq.com.


As always, if you are a staff member at CFSD, you can contact your Tech Coaches for more information.

Thursday, March 3, 2016

EdCamp Eau Claire - Whats the Big Deal?

EdCampEC is BACK! This year, the event of the region will be held on April 9th. 

Location: Chippewa Falls Area Senior High School - 735 Terrill St, Chippewa Falls, WI. 

Registration is OPEN. CLICK HERE!

**New this year***
We will feature speaker Dr. Brad Gustafson, principal of Greenwood Elementary School in Wayzata, MN. See more here on how Dr. Gustafson uses Connected Learning to engage and empower his teachers and students: https://vimeo.com/137245269. And, I heard he's bringing robotics challenges... This is something you will all want to try!

- - -- - -- - -- - -- - -- - -- - -- - -- - -- - -- - -- - -- - -

Don't know what EdCamp is? Read on...

Have you ever been to a conference, attending 50-minute sessions throughout the day, only to realize that the session you really wanted didn't exist? Or that the session description misled you in regards to the actual content of the session? Or you already knew everything the presenter was talking about? Or found that time networking after-hours revealed more beneficial, practical information than the conference sessions themselves? Have you been looking for a way to overcome these conference woes? If so, EdCamp - Eau Claire is your answer!

EdCamps occur all over the country. They are designed as an un-conference... no presenters, no pre-planned topics, no limit to the discussions that can take place. Born from the power of collaboration among colleagues, EdCamp began in May, 2010 in Philadelphia. Planning goes into registration, promotion and donation-gathering. No pre-planning goes into securing presenters, selecting topics or choosing presentation proposals.

This may seem strange at first, but have faith. When teachers gather, they already know what they want to talk about. It might be effectively using Twitter to reach high school students; or using collaboration tools in Google Docs to give students meaningful feedback throughout the writing process; or strategies for effective classroom management when using technology tools. Anything goes!

EdCamp Eau Claire first debuted in April 2014. On the morning of EdCamp, attendees submit their ideas for sessions. EdCamp planners choose rooms and times for the ideas. Attendees choose sessions to attend, and discussion begins, collaboration ensues, and magic happens...

Unlike a regular conference, attendees at EdCamp may choose sessions for different reasons: first, they may choose a session because they are interested in listening, asking questions and learning more; second, they may choose a session because they are passionate, experienced or knowledgeable about the topic and interested in helping lead the discussion. Each session ends up with a different feel, different discussions and a different outcome.

If this sounds like something for you, consider attending EdCamp - Eau Claire on April 9th. We will host this amazing event at the Chippewa Falls Area Senior High School - 735 Terrill St, Chippewa Falls, WI. Registration is OPEN. There is no cost to attend and food will be provided!

Follow: @EdCampEC on Twitter to get up-to-date information, including where and how to register.

For more information about EdCamp Eau Claire, including registration, visit: https://sites.google.com/site/edcampecwi/home.

For more information and to find other EdCamps in the area and across the country, visit http://edcamp.org/

**Much of this content is from a previous blog post in February 2015.**

Tuesday, March 1, 2016

Practice Arguments with Apples to Apples

A fun and engaging way to practice argument in your classroom is to play a modified game of Apples to Apples. In the traditional board game, players are given a hand of noun cards. The dealer places a verb card out for all players to see. Each player secretly places their best noun card on a stack for the dealer. The dealer then chooses the best match based on his or her own opinion or interests. The dealer can choose the most humorous responses, the best representation, the craziest response, etc. Players in each round can verbally support their own card by stating arguments for why their card is the best choice. 

In this educationally inspired version, teachers create green theme cards and red subject cards in sets for students to utilize. In this round, a student may argue that Richard Nixon was NASTY because he was the “only president to ever resign, began the idea of citizens questioning and not trusting their leaders ever again."

The dealer would choose the best match for NASTY based on the argument evidence and/or reasoning that each student made for their subject card.

Linked below is a slide presentation with all of the instructions and templates for creating the cards: https://goo.gl/8PfoAS.

**Thanks to Ryan O'Donnell (@creativeedtech) of creativeedtech.weebly.com for posting this idea on Twitter, and creating the templates.

Monday, February 15, 2016

Seesaw - Showcase Student Work for Parents

Written by STII Student: Jason

How many of you have wanted to document what a student is doing? Or document what a student has done? With an app called Seesaw, you can take a picture or video of such thing.
download.png
seesaw-folders-flags-feed-view.pngWhen a student uploads content to Seesaw, it can be organized into a certain folder. It is then accessible by any teacher at any time. This also helps so teachers and students can watch their growth. Another feature that can be used is that a teacher can flag a certain item to either ask a question, or review such item.  This app can also be accessed anywhere. So parents can also watch how their student is doing, along with what they are doing during the school day.

Seesaw is available for the iPad in the app store for free. When parents download the app, they can see only their own student’s work. You only need one iPad in your classroom to use Seesaw! Get started today!


For help getting started or questions, contact Sarah Radcliffe (x2216) or Cara Schueller (x2587)

Friday, February 12, 2016

Google Forms Gets a New Look

For a while now, you may have noticed Google asking if you would like to try the new Forms.  The interface is revamped with a new look and supposedly easier to use.  I have been hesitant to encourage staff to switch to the new forms because the ability to use Add-Ons was not there yet.  For many seasoned Google Forms users this was a huge deficit. Much of the power of Forms comes from how you can control the distribution of the form or manipulate the form submission data with Add-On tools.

I am happy to report that you may make the switch because Add-Ons are now available in the new interface.  Try it out.  I think you will like the new look and features.  


Below are two great articles detailing some recent updates to Google Forms.  


Tuesday, February 2, 2016

Tech Tool Spotlight: Google Docs Creation Links

Tech Tool Spotlight: Google Docs Creation Links
by: Isaac Wisti

The Google Drive suite is a wonderful tool that we use in this district, but it can be a little bit of a hassle to create a new document. You have to go into Google Drive, find the folder you want your document to be in, then you have to click new, and finally click document. This process takes an average of about 20 seconds, and takes even more if you are an extremely organized person that uses a lot of folders. Fortunately, there is an alternative route: you can create a bookmark.

By using a bookmark, you don’t have to enter Google Drive at all, saving you over 15 seconds every single time. This is useful to both students and teachers alike. Not only do you save time, but it is just feels better, at least in my opinion, to click one button rather than go through a 4 step process in order to make a new document.

To get it set up is just a couple simple steps.

First, right click your bookmarks bar and click “Add Page” as shown in the image (similarly, if you are using Firefox hit “New Bookmark”) Addpage.PNG

A menu will pop up, it will ask you to enter a name and link. You can put whatever name you want to in the first box, I recommend the name “New Doc.” The second box must be the following without the parenthesis, (docs.google.com/document/create). You can then click the save button, and you’re done!

Name doc.PNGThis process also works for presentations, spreadsheets, forms, and drawings, you just have to replace the word “document” with the corresponding word.

There are two issues with doing this, however both have solutions. The first is that when you create a document this way, it will be in your main Google Drive folder, not organized at all. The fix for this is to use another feature that allows you to move a document to a folder from within a document.

The other issue is that these bookmarks can take up a lot of space on your bar, this is fixed simply by putting them in folder on your bookmarks bar.

Hopefully you found this as useful as I did, and it will save you some time and hassle.
move2folder.PNG


List of things to replace document (in the link) with:
  • spreadsheets
  • presentation
  • form
  • drawing

Wednesday, January 6, 2016

Tech Tool Spotlight - Quizlet

-Written by: Emma
Senior student in Student Technology Integration and Innovation

There are important terms to know for every class taught in school. The degree to which students are tested on these terms varies, but a basic familiarity with them is essential. Traditionally, students use flashcards to memorize vocabulary. It’s an effective method of learning, but there are some serious flaws. For one, flashcards are time consuming to make. There are classes with upwards of a hundred words to learn per unit, and making that many flashcards every few weeks just isn’t feasible.

Quizlet.com is a website initially started in 2005 by a fifteen year-old in California looking for an easier way to learn vocabulary for his French class. Essentially, it’s online flashcards. Quizlet is both free for students and easy to use, with many students already having some experience with it. It includes games that make learning entertaining, and offers a free app students can get on their phones should they choose.

Signing up for Quizlet is simple and only requires an email address. If you register as a teacher, you’re given the option to pay $24.99 a year for added features such as tracking student progress. That might be something you’re interested in. If not, there’s an option to skip to the regular teacher version of Quizlet, which still allows you to create classes and add flashcard sets to them just as efficiently as the premium version.

Quizlet is fast, easy, and free if you want it to be. Students can study from their phones, and this way they can’t complain that you’re killing trees with all the study materials you’ve been printing out. With the added ease of not having to buy, store, and keep track of hundreds of notecards and finals right around the corner, there’s really no better time to start using Quizlet.

Wednesday, December 9, 2015

Tech Tools on the Tech Coach Blog

I have committed time in the past to making sure that I write a blog post (nearly) every Tuesday. Sometimes I stop, with fear. I could say I'm too busy, but really I'm scared. What if no one reads this stuff anyway? What if I feature a tool that people already know about? What if I brag about a tool and then it doesn't work? Fear - maybe I'll think of a better way to do this that will help everyone! Stalling with fear.

I just finished attending one of the best installments of the Slate Technology Conference in WI Dells that I have ever been to. (Search the hashtag #slate2015 to see what you missed!). Kevin Honeycutt was the opening keynote speaker. He said, "Perfect is the enemy of done. Start!" How true is that? I have stalled myself out with worry and in the meantime, missed out on sharing ideas, tips, tools and technology integration with my teachers!

No more! In fact, I'm going to do you one better. I'm not sure if you've heard, but our high school students spend one class period per day fixing broken Chromebooks at the high school. Yes, you read that right. We have a technology repair workshop in our very own district run by high schoolers. You're probably a teacher, a principal, a secretary, support staff... so I don't have to tell you that kids can be amazing.

Our class is called Student Technology Integration and Innovation, or STII for short and these repair students have certain job duties that rotate each week. Several of them diagnose, troubleshoot and repair broken devices; one enters data in our data warehouse spreadsheet; one is a Quality Control Manger and makes sure that the repair is done correctly in a timely fashion and that the Chromebook is cleaned up and charged to be returned in better condition than it was received. Each week, Ms. Amblang takes a couple of students to the public library to help community members with their technology on Tuesdays. And, two students have Special Operations assignments (aka Special Ops). These tasks vary depending on the needs of the workshop and workflow.

Starting next week, there will be a new position for 1-2 students. They will research, vet, and explain technology tools and techniques that could interest teachers in our district. They will blog about those tools or techniques right here on the Tech Coach blog!

So, stay tuned... because when it comes to my STII students, I like to brag about how amazing they are. And this, this is going to be awesome! You'll see, #mightycardinals, the best is yet to come!

Tuesday, April 21, 2015

How to Sell Items on Watercooler and Make Your Buyers Love You

Being part of the watercooler group is somewhat of a blessing and a curse. On the one hand, you can find things for sale that you never even knew you needed until you saw it posted for such a good deal! But, on the other hand, there are so many emails that clog your inbox. Even if you filter the messages or even ask them to skip your Inbox, it can get overwhelming. Then, as if that isn't enough, you get follow-up emails from people that say when things have been sold. And, yet, there are still about 400 people on watercooler, including me! So, I have some suggestions on how to sell multiple items on watercooler, while also decreasing the impact on people's inboxes and making buyers love you!


First, we can leverage the power of Google to set up a virtual thrift sale. Just create a new folder and set the sharing settings to "anyone with the link can view." People will be able to open your folder and look at all of your goodies. You can right click on the image to enter the name of the item and a price. You can also put a Google document in that folder that provides descriptions and prices. As people purchase your wares, simply delete the photo from the folder and it will not appear to your shoppers.


To start a new folder, use the red "New" (Or "Create") button on the left side of your Google Drive Screen and choose "Folder." A new folder will be created in your Google Drive. You can single-click on that folder and then use the image of the person with the plus by it to change the sharing settings of the folder. You will need to do this in order for people to be able to open your folder. You will likely want to set it so that people with the link can view the folder so that no one except you can delete images from the folder.


Then, begin dragging and dropping or uploading your photos to the new folder. You will want to probably set the folder to thumbnail view so that people see a gallery of photos in the folders.


Once you try this once, you'll see that the setup is pretty easy and then you'll have it all set to go next time you have things to sell. Once your shared folder is set up, then you can share it in your email with the watercooler group. When you compose an email, click the Google Drive symbol near the "Send" button and you can choose your shared folder. That folder will appear as a clickable link in the email.


This way, you can send one email to the watercooler group with information about the types of things you have for sale, and a linked folder of images and/or descriptions. As you sell your items, delete them from the folder and they will no longer be available for viewing. If you need help setting this up, just get in contact with me. You'll make the other 399 members of watercooler so much happier to decrease their watercooler emails by about 75% while still being able to shop for things you never even knew you wanted because it is such a good deal!
For an example, feel free to see my shared folder "Items For Sale" by clicking the link below.


Folders for shared images work really well for other things also. If you have photos from a field trip, you can upload them to a folder and set it so that anyone with the link can view and send the link to parents. Parents can see and download images of their own students without worrying about attachment limits. You can share a folder of images with students to help further illustrate certain concepts in your classroom. What other things have you used shared folders for?


Saturday, March 21, 2015

Got Spelchek?

Just as in other Word Processors like Microsoft Word and Word Perfect, Google Docs also has spellcheck capabilities, but this is a function you can turn on or off. Teachers have noticed that some students have this turned off and are not notified of spelling errors in their documents. Using Spellcheck can be an easy way of catching little mistakes and typos.

To turn Spellcheck, make sure that you select 'Show Spelling Suggestions' on the View menu as seen below.


Friday, March 20, 2015

Almost Like Magic

If you have ever wished there was an easy way to convert an assessment, exit slip or study guide to a Google Form, your wish has come true.

wZcGXq

Doc to Forms is an Add-On available in Docs.  This Add-On opens a sidebar in your Google document and makes it very easy to move the text from your doc to the form questions.  Select some text, click here, cut and paste there, add a few semicolons and voila your form is mostly done.


Finish applying your theme and adjusting other necessary settings in the new Google Form and you are ready to start collecting answers.

Now, if there was an Add-On that would create the form questions automatically based on formatting styles - that would be magical.


Monday, March 16, 2015

Google Search Results by Reading Level

Doing research using Google searches with younger students or struggling readers can be difficult if the students can't comprehend the content of the websites. You can use the Search Tools in Google to return search results by reading level - Basic, Intermediate or Advanced. Reading level seems to be based on the length of the text as well as the level of vocabulary.