Tuesday, October 14, 2014

Those Pesky "Request to Access" Emails from Google Docs...

Many of the participants at Google Summer Camp this summer, and Google After Hours last spring, took time to create or improve their Google website. One of the things that makes Google Sites appealing is how easy it is to embed or link Google documents, calendars spreadsheets, etc on your webpage. Teachers use this feature to link their course syllabus or lesson plans that can be quickly updated in Google Drive and live synced with your Google webpage.

Since starting or improving your Google Site this summer, you may have received emails like this requesting access to a document:


These emails are most likely coming from students or parents, but may also be coming from other teachers wishing to view your lesson plans or posted assignments. What this means is that you skipped a step. Even when your website is public on the web, all of the documents retain their sharing settings, so if you have the document set to "private" then no one can access the link or open the embedded document. Simply changing the sharing settings in Google Drive will stop these emails from clogging up your inbox. 

Follow these steps to ensure that your documents are viewable, but cannot be edited by people visiting your website.

1. Click the Share button in the top right corner of your screen. Click Advanced in the Share with Others box that pops up.

2. In the Advanced Sharing Settings Window, click "Change"


3. Click the radio button next to "Anyone with the link" and then make sure it says "can view" at the bottom. Hit save and you are on your way to less email clogging up your Inbox.

As always, if you have questions or concerns about this process, give Sarah (x2216) or Cara (x2587) a call in the Tech Coach office.


Tuesday, October 7, 2014

Browser History, Cache and Cookies, Oh My!

You may have heard of cache and cookies related to web-browsing and thought, while craving a sleeve of thin mints and a glass of cold milk, what in the world does that mean? Put simply, when a web browser is used to access the internet, that web browser, such as Google Chrome or Internet Explorer, saves a little bit of the information from the website you are visiting. For example, if you frequently visit a webpage that contains a lot of images, your browser may save some of the images so that the webpage can load faster. Cookies and cache are also what are used to autofill your username and password on some websites.

What happens when you visit the same sites over and over again is that your web browser may try to access cached data that has timed out. That makes your browser think that you are signed in already, but the website things that you need to sign in again. This can cause a multitude of problems with the access to the site that can cause problems like blank pages, pages that look like a bunch of colored text, etc.

Periodically clearing your cache and cookies can help with this. Honestly, this is not something that I remember to do on a regular basis on its own, but it is one of the things that I try when troubleshooting a problem accessing a web page. The instructions are below, inserted from: https://support.google.com/chrome/answer/95582

Delete all your data

  1. Click the Chrome menu Chrome menu on the browser toolbar.
  2. Select Tools.
  3. Select Clear browsing data.
  4. In the dialog that appears, select the checkboxes for the types of information that you want to remove.
  5. Use the menu at the top to select the amount of data that you want to delete. Select beginning of time to delete everything.
  6. Click Clear browsing data.
You can choose any timeframe for deleting cache and cookies, but generally I choose "the beginning of time." You will also have options for what types of browsing history to clear. I generally choose the top 4 boxes and that solves the problem most of the time.

Tuesday, September 30, 2014

Chromebook Troubleshooting 101

Below is a document that Cara sent out to students in the past couple of weeks. It is a good document to refer students to when they are having trouble with their Chromebooks. These troubleshooting tips can solve  most problems students would encounter.


Chromebook Troubleshooting Tips for Students 

Check wireless connection.  It should be connected to CFSDStudents.  Password  gocardinals The password must be spelled correctly in all lowercase.  If you have to do this more than one time, please check with the library.

At least once a day you must authenticate on the Lightspeed filter with network username and password. This is a white page with the district logo and a username and password entry field.

Log in to the Chromebook browser with Google account credentials.  username@chipfalls.org and network password.

If the Chromebook is repeatedly connecting to a wireless network other than the CFSDStudent, please check with the library.

If an app, the sound or keyboard is acting quirky, or not working at all, try closing all the tabs and the browser.  If that does not work, try shutting it down using the shutdown icon from the lower right system menu or pressing the power button for at least 10 seconds.

Check for updates by choosing the Settings menu from the system tray then clicking on Help.  You may need to restart after it finishes.

Disable extensions and see how things work.  Re-enable one at a time to see if the problem re-appears.

Check accessibility features in the Settings menu to turn of spoken feedback or modify mouse and display settings.

If camera does not work, check Settings, Help to update to the latest version of Chrome.

If you are successfully connected to the Internet, but cannot login to a particular website that you have used in the past, go to the Chrome menu (3 lines in upper right corner), click History, click “Clear browsing data...”, make sure at least the top 4 boxes are checked. Click the “Clear browsing data” button.

Power off Chromebook nightly using the Power Off icon.

Friday, September 26, 2014

Lost Chromebooks

The dust has settled a little bit in the Tech Coach office at the high school. Chromebooks are out to students and teachers have taken off utilizing this technology in the classroom. We have been working hard on developing quality processes for common scenarios such as, "I forgot my Chromebook at home" - the 2014 version for 'my dog ate my homework.'

One of the more alarming scenarios, but thankfully not too common, is the "I lost my Chromebook." When this happens, we talk to the student about where and when the Chromebook was last used. Because they are teenagers and their prefrontal cortex is not fully developed, plus the fact that a lost Chromebook puts them into fight or flight mode, it is not surprising that students have a difficult time recalling the last time they used their Chromebook.

In the Tech Dept, we can check the last time the student authenticated on the wireless at school and who was the last user to log into the Chromebook. This helps us put the pieces together as to where the Chromebook might be.

Just after we email the technicians to start digging into log-ins, we also email the teachers on the student's schedule to see if the Chromebook was accidentally left somewhere, even though the student swears that they left it at the football game Friday night. Almost every time this happens, the Chromebook turns up in a teacher's classroom.

A very helpful step in this process would be if a student leaves his or her Chromebook in your classroom, please email Sarah Radcliffe, Cara Schueller, Amy Ambelang and Mary Hertzfeldt. Then, when the student dutifully reports to the library to reluctantly report their Chromebook is missing, we can point them directly to where we already know it is waiting.

Thursday, September 18, 2014

Student Presentations in Google Drive

"A day late and a dollar short" or "Better late than never" however you look at it, this week's Tuesday Tech Tip is coming to you on Thursday. I think we'd all agree that "Thursday Tech Tip" just doesn't have the same ring to it.


Many teachers have been asking for ways to easily display student work on the SMART Board or via the projector in the classroom. It is exciting to utilize technology to allow students to create and share. In our district, we have tried wireless projection methods like Apple TV and Chromecast (the Chrome version of the Apple TV) and we still have a lot of configuration and work to do in order to make these options effective. We are going to continue to look at easy ways to share student work in the classroom, however for now the best way to share student work is to use the desktop in the classroom that is connected to a projector.  


The best way to display student work from Google Drive is to use your desktop computer that is already connected to the projector or SMARTBoard and open an incognito window for the student as they come up to present.


Incognito windows are meant to not track web traffic. Therefore, it is not connected with your account and allows you to have the student log in without you logging out or adding users to your account.


To open an incognito window in Chrome:


When you open a new incognito window you will get a warning like this indicating that your web traffic can still be monitored but will not be stored in your history or cookies:

In your web search bar, you can type "drive" and you will get a log in prompt for the student to log into Google Drive. You can close that window and open a new incognito window for the next student presenter.

Tuesday, September 2, 2014

Copy/Paste on Your Desktop Computer with Google Docs


If you have started using Chrome as your main web browser and continued to explore Google Docs as a way of creating and sharing documents, you have probably noticed that there are some difficulties with copying and pasting between documents, particularly actions such as copying from Microsoft Word and pasting into Google Docs. I have inserted Google's instructions for using the Google Web Clipboard below. These should help you. It is just as easy as 'normal' copying and pasting, but has a few advantages also.

Firstly, it works on a desktop computer to paste between applications. Functioning properly is definitely a benefit! Secondly, you are able to copy/paste multiple strands of text, images, charts, etc without the web clipboard erasing your last entry. For instance, if I have an image and a strand of text, I can use Edit->Copy to Web Clipboard for each item and then use Edit -> Web Clipboard and select the text or image you want to paste. Third, you can access the Web Clipboard on multiple devices as the clips are saved in the cloud. As long as you sign into the same account, you should be able to copy something on one computer and paste it using another.

You can clear your copied items whenever you choose, otherwise, they will stay available in the Web Clipboard for 30 days. Below are the instructions from the Google Help pages.

--------------------------------------------------------------------------------------

There are a few cases in which the best way to copy and paste is using the web clipboard tool. With the web clipboard tool, you can copy more than one selection and then choose which one to paste later; it also lets you copy something on one computer and then paste it on another.
Select what you'd like to copy.
Click the Edit menu and select Web clipboard.

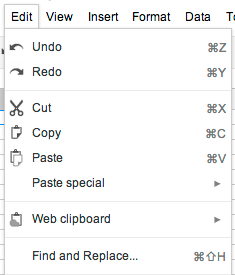
Click Copy selection to web clipboard.
In the destination file, click the Edit menu and select Web clipboard again; you'll see the selection that you previously copied. If you copied multiple things, you'll see a list of the items you've recently copied.
Place the cursor where you want to paste the content.
Select Web clipboard from the Edit menu.
Select what you want to paste. Depending on your selection, you'll see different formats that you can choose from to paste what you've copied (for example, HTML or plain text).
Select a format.

Drawings

You can use the web clipboard to copy shapes from drawings and paste shapes into drawings embedded in Google spreadsheets, documents and presentations, or to copy and paste a drawing from a doc into the standalone drawing editor.

Click the Edit menu, select Web clipboard, and then select Copy shapes to web clipboard. Then, open the document that you want to paste the drawing into. Select Web clipboard from the Edit menu, and then select the drawing you want to paste from the menu.

Presentations

You can't use the web clipboard to copy and paste regular text and images in Google Slides yet. You can select entire shapes on a single slide, and if the shape is a text shape, then the text will be copied to the server clipboard.

Charts

You can use the web clipboard to copy and paste charts from a spreadsheet into a document or drawing.
How content on the server clipboard is stored and protected

You can access the content copied to the server clipboard only by signing in to the same Google Account you used to copy the content originally.

Content you copy to the web clipboard is stored on Google's servers and remains there until 30 days have passed since you last took action on (for example, copied) a given content selection. Even if a document is deleted, anything you copied from that document to the server clipboard will still exist on Google's servers for that 30-day period. You can delete all items stored on the server clipboard by clicking the drop-down menu and selecting Clear all items.

Tuesday, August 19, 2014

Setting Gmail as the Default Mail Handler for Opening E-mail Links


Many have asked for the ability to click a mail link and have it open a new Gmail message instead of launching Outlook, which we don't use anymore. These instructions will work for other mail-to links, but the request is most common for people wishing to click on the email address of a parent in Infinite Campus and have a Gmail message automatically pop up instead of trying to launch Outlook. If you are in the habit of using mail links, you should follow these steps to ensure that the messages you create with a mail link actually go out. (Otherwise they may sit in the Outlook outbox and never actually send.)

You will need to remove a setting in Outlook, enable a setting in Gmail and make Chrome your default browser. Here are the steps.

  1. Open the Outlook application on the desktop (not the Web Access), Choose File, Options, Uncheck box to make Outlook the default mail program (the last choice under Options on the General section) 
  2. Click the two diamonds icon in the browser address bar in Chrome. Tell it to use CFSD mail as the default mail program. 
  3. Make Chrome the default browser. Chrome Menu, (three lines in right corner), Settings, Set Default Browser towards bottom of page. 
This should allow you to click a mail link when viewing a record in Infinite Campus via Internet Explorer or Chrome and it will open a new mail message in Gmail. This should also allow you to use a mail button from within another application to bring up a new mail message.

WARNING: If you make Chrome your default browser, the desktop shortcuts for any web addresses (including Infinite Campus) will change to a Chrome icon and will automatically open in Chrome when you use them. You will need to selectively open Internet Explorer to launch a site if you wish to use it in IE.

Creating a Class List on Google

Creating a Contact Group for your class(es) can be very beneficial. It makes it easier to email your students all at once and share documents to groups by typing in the group name rather than typing in every email address.

You can create class lists by going to Contacts, clicking New Group and following the steps, typing in each student to create the group. If you have multiple classes, this can be somewhat time consuming. There is a way to create contact groups using your Infinite Campus rosters. Its not for the faint of heart - there are a lot of steps - but Nick Gagnon used some of his Google Summer Camp time this week to create a detailed tutorial. You should be able to follow the picture steps in his tutorial to create class lists based on each course.

Those instructions can be found here. Thank Nick next time you see him!

Creating a Class List Using Infinite Campus Rosters

Tuesday, June 3, 2014

SMART Notebook Updates Coming to CFSD

Over the summer we will be upgrading to SMART Notebook 2014.  There are several technical reasons that lead to this upgrade and although it means your SMART Notebook software may look a little different in terms of toolbars and layout, we think you will appreciate all the new features that come with the latest version.

Read below for some of the highlights, or watch this video for a demonstration.

Key enhancements in Notebook 2014: (taken from SMART website where quoted)

New tools
"Easily create and deliver engaging lessons with new functionality in SMART Notebook, including a paintbrush pen and image editing tool."

Ink editing
"Enhance instruction with automatic handwriting recognition and conversion combined with intuitive text editing capabilities. Now you can edit, move, delete, modify or insert text objects without reaching for a keyboard."

SMART Response VE
"Seamlessly transition between lesson delivery and assessment. Students can respond to planned and spontaneous questions and quizzes from any Internet-enabled device, anywhere."  If you use or have used SMART Response, you can now have students respond from any device that has internet access. Great for classrooms that do not have enough clickers, or if you don't have access to any.

XC Collaboration Basic
"Stimulate collaboration and discussion while incorporating mobile devices into your SMART Notebook lessons in new and exciting ways." Start a collaborations session and students can contribute to the activity in real time via multiple web devices. 

SMART Notebook Math powered by Geogebra
"Improve math functionality for all grade levels with more than 55,000 math content objects and interactive activities for geometry, algebra, calculus and statistics. It supports both Mac and PC." Check out this video for a demo.SMART Notebook 3D tools
"Provide truly immersive learning through the use of 3D objects right in your SMART Notebook lesson."

SMART Notebook Connect
"Find and explore new content, resources and professional development within SMART Notebook."

This change will look minor for those of you using version 11.x. If you are still using 10.x, the toolbars will look different and it is a major feature enhancement.  We have arranged several opportunities to brush up on your SMART skills this summer.  Check the Professional Development Portal for details.  To check the version you are using, click the Help menu, choose About, look on the Technical Support tab.


Monday, May 5, 2014

New Google iPad Apps

Google recently released two new apps for iPads: Google Docs and Google Sheets. These apps work in conjunction with the Google Drive app that is already on our cart iPads, and many of our teacher devices. The good news is that Google promises to also release a Google Slides app soon, which would allow creation of Google Slide Presentations on an iPad - yay!

However, one major caveat of this new venture is that the Google Drive app itself no longer allows users to edit Google Docs or Spreadsheets. Google Drive remains an app on the iPad to show your files stored in the cloud, but if you attempt to edit a document, that document opens automatically in either the Google Docs or Google Sheets app.

This is particularly troublesome for anyone using our iPad carts for projects in their classroom and relying on Google Drive for storing partially completed projects or relying on Google Drive to share completed projects with the teacher.

The Technology Department is working on conjunction with the LMC Specialists to determine the best time to collect the iPads, transport them to the middle school and make the necessary updates. If you have the cart checked out and plan to use Google Drive, please consider revising your plans or letting your LMC Specialist know that you won't be using the iPads.

If you use Google Drive on your own iPad, you will need to visit the App Store and download two new free apps: Google Docs and Google Sheets.

If you have any questions, please contact Sarah Radcliffe

Friday, May 2, 2014

Become a Google Educator

Becoming a Google Educator: An Opportunity for CFAUSD Teaching staff


This semester, we have been able to offer many courses in Google Apps for Education (Gmail, Calendar, Google Docs, Drive, Sites, etc) after school as part of Google After Hours. The instructors for Google After Hours are “Google Qualified Individuals.” To achieve this certification, these teachers took part in a two-day training in the Spring of 2013, culminating with 6 multiple choice exams. Passing of these exams allows an individual to reach the status of Google Qualified Individual.


Google has since changed some of their qualification measures. Now, passing of exams in four required areas, plus at least one elective area achieves a status of Google Educator. Once you pass the exams, you will receive a Google Educator certificate and be off and running with a deeper understanding of Google Apps for Education and all it encompasses. You will be more able to begin working toward integrating technology with your curriculum in a way that allows more effective and efficient teaching.


Exams:
All (Required):
  • Gmail
  • Calendar
  • Docs & Drive
  • Sites
At least one (Electives):
  • Chrome Browser
  • Chromebooks
  • Tablets with Google Play for Education
  • Implementing Google Apps
Benefits from Google:
  • certificate indicating completion of exams
  • option of applying for Authorized Google Education Trainer or Google Certified Teacher


Benefits from CFAUSD:
  • opportunity to attend paid training by (almost) Authorized Google Education Trainers from our district to help you with the material needed to pass the exams
  • exam fees paid by the district
  • demonstration of teacher leader qualities by attaining certification
  • opportunities to provide training to fellow colleagues starting August 2014
  • beneficial skills set important for applying for Chippewa Falls Innovative Teacher Grants for Technology


Timing:
  • Training opportunity will take place June 23rd and June 24th. You are required to attend both days.
  • June 24th - July 31st work independently or in small groups to study for and pass exams
  • Week of July 28th work with Cara and Sarah on preparing for delivering August professional development


If you are interested in pursuing becoming a Google Educator, please fill in the following form with your information. We will get in touch with you in the next few weeks to discuss further. Teachers may be chosen based on curricular readiness and teaching area (grade, school, etc) upon recommendation of building principal. Further information can be found here: Google Certifications.


Thanks for considering. If you are interested, please fill out this form by May 18th.
Interest Form

Monday, April 14, 2014

Google After Hours - Get Them While You Can!

Can you believe it is halfway through April? Neither can I. But, it is - which means that we are closing in on the end of Google After Hours sessions for this school year. There is still some time left to "Get Your Google On" before summer.

Google Projects and Project-Based Learning: This session will focus on using Google tools to create projects and allow students to creatively meet common core state standards and learning goals. There will be basic information about what project-based learning is, example projects from our school district, and lesson planning templates for starting a project. You will have time to explore resources and begin planning a project of your own. If you'd like to attend this class, sign up via the staff portal. You will meet at the middle school in computer lab 410 from 4:00-5:30.

On April 16, Jennifer Handrick will walk you through using Google (web)Sites to create a digital portfolio to demonstrate student learning. Jennifer has been using Google Sites for art portfolios for her students for some time. She has practical tips and ideas about how to get started. A basic knowledge of Google Sites is helpful, but this class may be applicable for any teacher considering using digital portfolios. This class will meet in HS lab 135 from 4:00-5:30.

If you haven't been to a basic Google Drive/Docs session, you have one more chance to get your feet wet with Google Drive before summer. Kris Kolinski and Michele Nuttleman will explain the basics of cloud sharing, finding and organizing files in Google Drive and some of the basics of creating a Google document. They will also demonstrate different ways to share documents with your students, other teachers, or parents. Kris and Michele will demonstrate these skills on April 17. The location is yet to be determined. They have also promised to deliver this training completely in English!

If you've taken some basic training or have worked with Google Apps for some time on your own, you may be ready for something more advanced. Google has some tools called Add-ons (also known as Scripts) that will create and organize folders, send work out to students, grade multiple choice assignments, and allow you to create and digitally grade using a rubric which also sends feedback directly to the student's email. This session will be the grand finale for Google After Hours for the semester. Chrissy Seibel and her team will present this information on April 23 in HS lab 135 from 4:00-5:30.

If you're not able to attend Google After Hours, but still have a burning desire to improve your Google Apps for Education skills, don't worry. Cara and I are working now on putting together another dynamite summer session of offerings for teachers. If you have specific questions or suggestions, feel free to email your technology coaches.

Sarah
radclisa@chipfalls.org

and

Cara
schuelcc@chipfalls.org

Monday, February 24, 2014

How To Not Invite the Entire District to Join you on LinkedIn.

Some people have been mentioning receiving multiple email invitations from fellow employees to join them on LinkdIn. There have been a lot of questions and concerns about these emails. When you receive an invitation to connect with someone via LinkedIn, please check to see who the invitation was sent to. 

If it was not sent directly to your email address, do not click the connection. 
There are two mistakes that can happen when creating a LinkedIn account.  Well, I suppose there are more, but these are the two most common for our district users. Read on as I explain how they happen and how to prevent them.


When creating a LinkedIn account, or updating your profile, the website often recommends ‘people you may know.’  Look twice at the screen and the items that are selected before clicking the Continue button.  It may have suggested hundreds of people and will have them selected by default. If you click continue it will invite them all.  It should give you a spot to click “Skip this step”.  If you would like to connect with some of the people it suggested, uncheck the Select All box and manually select the ones you choose.


Frequently, it also asks if you would like to connect to your email address book.  If you say yes, or if you have inadvertently connected it in the past, it may select all the contacts from your address book.  This can be a large number of people, for instance, every person in your address book, which could include parents and students. It should give you a spot to click “Skip this step”.  


The biggest problem with this second step is that you may have a lot of group email addresses in your contact list, such as watercooler@chipfalls.org or the building all_staff email addresses. It will send an invitation to all those groups.  This means if I am a member of several groups in your contact list, I will get several invitations.


If that is not frustrating enough, it gets even messier.  If I click through the invitation that was sent to one of the group messages, for example, an invite sent to Watercooler, it will try to log in to or create an account for that email address. That means if I click on an invitation that went to watercooler@chipfalls.org and don’t realize it, LinkedIn will think my email address is watercooler@chipfalls.org. As soon as people start connecting with this new account it will send updates to the group email address, which means all notices would be sent to everyone in the watercooler email group.


In summary, when setting up a LinkedIn account, please take your time and read each screen carefully before you click Continue.

Thursday, February 20, 2014

Upcoming Google After Hours Classes

It has been a snowy week in western Wisconsin. We have had to cancel 4 Google After Hours classes due to weather conditions! Please keep checking the staff development link on the staff portal for updates. Some sessions with high interest are being rescheduled. If you have questions about the course content a session will cover, please email your tech coaches. Next week, we will be offering the following sessions:

2/25/14 - Uploading Your H: Drive to Google Drive (Basic) @ Hillcrest
Although CFAUSD employees still have access to H:/ drives and I:/ drives, there is limited space available to store documents. Your district Google account gives you 30 times the space allotted on your H:/ drive. Come learn about the benefits of cloud storage, tips about Google Drive and begin uploading the documents from your H:/ drive to your Google drive to give you more space and 24/7 access to your files. 

2/26/14 - Google Drive, Docs and Sharing (Basic) @ Hillcrest
This will be an overview of Google Drive, creating documents, sharing and collaborating. Participants should be able to log in to Google Drive prior to attending.  

2/26/14 - Collecting Student Work and Organizing Your Google Drive @ Chi Hi Room 137
Organizing your Google Drive can be a daunting task. Students share documents with you and your Drive can become overwhelming. Attend this session to learn ideas for alternative ways for students to electronically hand in their work, ways to organize student work in your drive, and other tips about electronic document management. Working knowledge of Google Docs and Drive is required for this session. 

2/27/14 - Google Projects and Project-Based Learning @ Parkview
Throughout our district and especially in our 1:1 program at the high school, innovative teachers are using Google Apps for Education to allow students to create fun, meaningful learning projects based on standards and curricular content. This session will give you an overview of some of those projects as well as providing discussion time for brainstorming ideas. Follow-up Technology Coaching will be available upon request to assist you with implementation.

Wednesday, February 19, 2014

Calendar Reminders and Notifications

You can change the way that Google Notifies you of calendar invitations, changes to invitations, responses from other guests, etc. Please see below for a tutorial. Be sure to click save when you are finished.


Thursday, February 13, 2014

Digital Cornell Notes Template

Many teachers in Chippewa Falls are using Cornell Notes as a way to help students organize information for note-taking. I created a Google Docs template for use with Cornell Notes in Google Drive.

Students and teachers can use this template for digital note-taking*. Simply create a Google document, click File->New->From Template and find Cornell Notes in the Chippewa Falls Area Unified School District Templates tab near the top of the page.


This will create a copy of the template so that it can be modified and renamed with an appropriate file name, such as Chapter 1 Social Studies Notes right in Google Docs/Drive. This document can be shared or collaborated on with the same capabilities of other Google documents.

If you have any questions, please contact your Technology Coaches at x2216.

*Please note that it is not currently possible to utilize Google Docs with tables on them in Google Drive on the iPad. If you have specific questions regarding students using the iPads to utilize Cornell Notes, contact Sarah Radcliffe at x2216.

Wednesday, February 12, 2014

Google After Hours Update

So far, about 75 of our teachers, administrators, and other staff have attending training through our Google After Hours sessions. Many people have even attended multiple trainings. This is amazing considering we have only completed 6 of over 30 offerings this semester. If you haven't had a chance to attend, you can sign up using the staff development portal. The teachers who have attended so far have given very positive feedback on the experience. Remember, follow-up coaching sessions to help with technology integration within your curriculum are also available. See below for details.

Number of Google After Hours sessions offered so far: 6
Number of staff members who have attended training: 75

Sessions offered so far:
Uploading Your H: Drive to Google Drive
Maximizing Your Google Calendar and G-Mail
Using Google Forms for Formative Assessments
Google Sites for Teachers and Students
Google Drive, Docs and Sharing Basics

Feedback:
  • 100% of respondents reported that the instructors were knowledgable about the topic covered.
  • 100% of respondents reported that the topic was relevant to the needs of their classroom.
  • 93% of respondents reported that they will be able to use the information in their classroom (some attendees don’t have classes)
Upcoming sessions:
  • Google Sites for Teachers and Students (2/12/14, HS room 137)
  • Uploading your H:/ Drive to Google Drive (2/17/14, PV LMC)
  • Maximizing Your Google Calendar and Gmail (2/17/14, MS Lab 410)
  • Google Drive, Docs and Sharing (2/19/14, HS room 137)
  • Using Google Forms for Formative Assessment (2/19/14, PV LMC)
For more information about follow-up coaching sessions, contact Sarah Radcliffe (x2216) or Cara Schueller (x2587)

Friday, January 24, 2014

Twenty-First Century Learning in Action at Chi-Hi

We've heard of the 4 C's of 21st century learning. If you haven't, don't worry, you can Google it. I heard words just like that from an encouraging English teacher this week. Knowing what the 4 C's are is easier than incorporating them into a 15-minute class activity, but Pam Bowe did just that in her English 9B class.
Collaboration- students worked in groups of 2-3 to read a section of an article on theaters through the ages
Creativity - students found an image to represent the information they read. They added it to a visual timeline.
Critical Thinking - students had to summarize their part of the article into three main points; determine an appropriate date for the timeline based on all of the given temporal information in the article, like which century it occurred.
Communication- after working in partnerships and adding events to a collaborative visual timeline with the other groups, partners shared responsibility for presenting their findings orally to the class.
None of the students had used Timetoast, a visual time lining tool, before, so they also discussed and problem-solved some technology work flows while experiencing the content.
And, there you have it: an activity based on common core state standards that incorporated the 4 C's of 21st Century learning. (And, I heard through the grapevine two other teachers are going to try this activity in their classes as well).

Thursday, January 16, 2014

Creating Gmail Templates


This video will walk you through how to create a template in Gmail. You might use templates to quickly compose frequent emails that include similar information. Gmail templates could also be useful for students learning to write formal emails.


Tuesday, January 14, 2014

Creating Contact Groups in Gmail

With the switch to Gmail, you may be missing some of your email groups.  You can re-create them in Gmail pretty easily as long as the people are in your contact list.  Click here for the video to show you how, or find the video on our Google Video Resources page on the Google Tutorials menu of the Tech Coaches website.

You may also be missing the district wide email lists that we had been using.  Dara has been diligently re-creating those as well.  The new list is available to you with this link when you are signed in to your Google account.

Wednesday, January 8, 2014

Presenting Keynotes Without the iPad!

We've often heard (and said) that the Apple devices we have on carts in our schools are called "i"Pads, not "we"Pads. They are designed to be personal devices and we've placed them in a cart, created check out procedures and shared them between students. This is a stumbling block on the way to more personalized learning, but it serves it's purpose and there are many obstacles we can work around if we think about it hard enough.

One of the most rewarding tasks we do as technology integration coaches is figuring out how to realize a teacher's dream outcome. I worked with Chelsea Anderson on some project planning today - she mapped out the unwrapped standards she intended to reach toward with her students and explained the content she hoped to incorporate. What happened next was she put her teaching pedagogy, knowledge and content expertise together with my technology skills and expertise and we discovered something that I hadn't thought of before.

Chelsea wanted her students to be able to do research and create a presentation on the iPads. She has the cart checked out for three days, long enough to produce the project, but probably not present it. So, we developed a workflow that could work for other teachers as well:

1. Students research and create a presentation in Keynote
2. Students upload their presentation as a Power Point to the Google Drive app
3. Students share their  Power Point with Chelsea
4. Chelsea clicks the box next to student's Power Point in her Google Drive and clicks More->Download
5. Power Point opens the presentation on Chelsea's desktop PC so that the presentation can be projected in the classroom for sharing.

If you'd like help with this process, please contact Cara Schueller or Sarah Radcliffe